DIY Sous Vide
I still think about my DAC project a lot, but the truth is that it is difficult for me to work on 30 minutes at a time. I still intend to continue with it, but sometimes other projects seem enticing because they’re more tractable in the time I have available!
Given that we’re basically stuck at home during this whole COVID-19 thing, we’ve been cooking a lot lately. Nothing fancy, really. I have friends who have Sous Vide machines, and in the past that was enough to satisfy my urge. However, during this time of social distancing, that isn’t practical anymore. I was tempted to buy a Sous Vide device, but in discussing it with the wife, the truth of the matter was that it was hard to justify. Honestly, we probably wouldn’t use it very often, and they are still rather expensive ($90 for a decent one, $200 for a “good” one).
That got me to thinking: how hard can this be, really? At the end of the day, it’s really just heating water and holding it at a specific temperature for a few hours. Well, let’s find out!
The Stuff
I made a quick list of things I’d need:
- Way to heat water
- Way to “precisely” measure water temperature
- Way to mix the water adequately
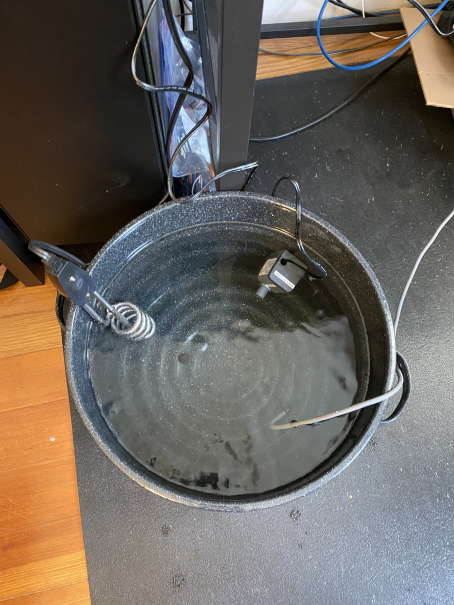
The first one is pretty easy to find on Amazon: I found a $14 1000W water heater. The $14 just screams safety. To control it (e.g. turn it on and off), I bought the IOT Relay, since I didn’t really want to be dealing with 120VAC circuitry just yet, especially with an 8 month old baby crawling around (safety first).
Since I’m not the first one to want to measure water temperature, the DS18B20 seemed appropriate, since it was easily available in a waterproof shield. The 1-wire interface made it fairly easy to hook up–I could use it with either a Raspberry Pi or an Arduino, either of which I already had.
Lastly, to make sure that the water was of approximately uniform temperature, I needed a way to mix the water. Fortunately there are a few options on Amazon for cheap ($10) submersible aquarium pumps. They’re absolutely not food-safe, but since the food will be cooked in a bag, I decided this was OK for me.
The Model
While I waited for the stuff to show up, I spent a bit of time playing with Python trying to model the system. I knew I was going to use some sort of PID loop to control the water temperature, so I wanted to brush up on that a bit.
There were two things at play in this system, heating and cooling. Heating obviously occurs when turning on the heater, and cooling occurs when the heater is off and the ambient temperature of the room cools the water. I chose to model these two in separate ways.
Heating
I decided to use the first law of thermodynamics for this–it seemed the most accurate for what I’m trying to do. Specifically, the formula
Q = m*c*delta_t
where
- Q is the amount of energy put into the system
- m is the mass of the object being heated
- c is the specific heat capacity of the object being heated
- delta_t is the desired change in temperature of the object being heated
With this, I made some assumptions:
- Since I ordered a 1000W heater, I assumed that this was a perfect heater that would deposit all of the energy in heat (this isn’t true in The Real World, but for Python models, I say it is).
- I’m heating 2 gallons of water (seemed like a good guess)
- I’m heating the water from room temperature (20 C) to 129 F (53.89 C). In practice, I’d probably use hot water from the tap to start with, but for this exercise, I chose room temperature.
With these assumptions, I can use the following substitutions:
- m = mass of 2 gallons of water = 7.57 kg
- c = specific heat capacity of water = 4,200 J/kg/*C
- delta_t = 53.89 C - 20 C = 33.89 C.
With this, I can calculate how long it will take to heat the 2 gallons of water.
Q = m*c*delta_t
Q = (7.57 kg) * (4,200 J/kg/*C) * (33.89 C)
Q = 1,077,498.66 J

1 Joule = 1 Watt/sec, with 1000 Watt heater
1,077,498.66 Joules / 1000 Watt = 1,077.499 seconds

1,077.499 seconds = 17.96 minutes
If my math is correct, it should take about 18 minutes to heat 2 gallons of water from room temperature to 129 F, a good temperature for a nice medium-rare steak.
Now, to simulate this, I wrote a quick Python class:
class Liquid:
    _heat_capacity = 0.0
    _temperature_c = 0.0
    _mass = 0.0

    HEAT_CAPACITY_WATER = 4200

    def __init__(self, initial_temperature_c=0.0, heat_capacity=HEAT_CAPACITY_WATER,
                 mass=1.0):
        self._temperature_c = initial_temperature_c
        self._heat_capacity = heat_capacity
        self._mass = mass

    @staticmethod
    def get_temperature_change_celsius(joules, mass, c):
        # Q = m*c*delta_temp
        # Q = thermal energy (J)
        # m = mass
        # c = material's specific heat capacity (J/kg/C)
        # delta_temp = delta temperature (*C)
        return joules / (mass * c)

    def temperature_c(self):
        return self._temperature_c

    def apply_heat(self, heat_watts, time_sec):
        delta_temp_c = Liquid.get_temperature_change_celsius(heat_watts * time_sec, self._mass, self._heat_capacity)
        self._temperature_c += delta_temp_c
        return self.temperature_c()
This code is written in a way that will let me simulate the heating process given steps of time, with the heater either on or off. A Liquid object is created as such:
amount_of_water_gallons = 2
mass_of_water_kg = 3.785 * amount_of_water_gallons

initial_liquid_temperature_c = 20.0
desired_liquid_temperature_c = 53.89

liquid = Liquid(initial_temperature_c=initial_liquid_temperature_c,
                    mass=mass_of_water_kg,
                    heat_capacity=Liquid.HEAT_CAPACITY_WATER)
And finally, the controlling part (where we turn on the heater and apply it for some amount of time). This is an example of applying the heater for 10 seconds:
heater_watts = 1000.0
liquid.apply_heat(heater_watts, 10.0)
Cooling
Using the same method for simulating cooling proved more difficult. For my purposes, cooling was simply the result of sitting in a lower ambient temperature. In this case, it was simpler to use Newton’s Law of Cooling:
delta_temperature = k * (liquid_temperature - room_temperature) * delta_time
where k is a constant. This part was tricky, because k is specific to the system
that you’re using, so I didn’t have a great way to figure out what value to use for
it. Through guessing how long it’d take room temperature water to drop a degree, I
came to use a value of 0.0001. This is probably wildly inaccurate, but this is really
just for fun.
With this in mind, I made some modifications to my Liquid class:
class Liquid:
    _heat_capacity = 0.0
    _temperature_c = 0.0
    _ambient_temperature_c = 0.0
    _k = 0.0
    _mass = 0.0

    HEAT_CAPACITY_WATER = 4200

    def __init__(self, k, initial_temperature_c=0.0, ambient_temperature_c=0.0, heat_capacity=HEAT_CAPACITY_WATER,
                 mass=1.0):
        self._k = k
        self._temperature_c = initial_temperature_c
        self._ambient_temperature_c = ambient_temperature_c
        self._heat_capacity = heat_capacity
        self._mass = mass

    @staticmethod
    def _newton_temperature(start_temp, ambient_temp, k, dt):
        return k * (ambient_temp - start_temp) * dt

    @staticmethod
    def get_temperature_change_celsius(joules, mass, c):
        # Q = m*c*delta_temp
        # Q = thermal energy (J)
        # m = mass
        # c = material's specific heat capacity (J/kg/C)
        # delta_temp = delta temperature (*C)
        return joules / (mass * c)

    def temperature_c(self):
        return self._temperature_c

    def idle(self, delta_time_s):
        ambient_temp_c = self._ambient_temperature_c
        delta_temp = Liquid._newton_temperature(self.temperature_c(),
                                                ambient_temp_c,
                                                self._k,
                                                delta_time_s)
        self._temperature_c += delta_temp
        return self.temperature_c()

    def apply_heat(self, heat_watts, time_sec):
        delta_temp_c = Liquid.get_temperature_change_celsius(heat_watts * time_sec, self._mass, self._heat_capacity)
        self._temperature_c += delta_temp_c
        return self.temperature_c()
PID Control
Ok, now we have code to control both heating and cooling. The real magic is now in
the control loop driving the whole thing. The actual machinery of the PID code is
not interesting, so I’m not going to include it here. I chose to have the output of
the PID control loop be a number between 0.0 and 1.0, representing the duty
cycle of the heater (percent-on), over a period of 35 seconds.
To tune PID loops like this manually, I’ve generally started by playing with the P term first, zero-ing out the I and D terms. In this case, I set P=1.0, and let it run:
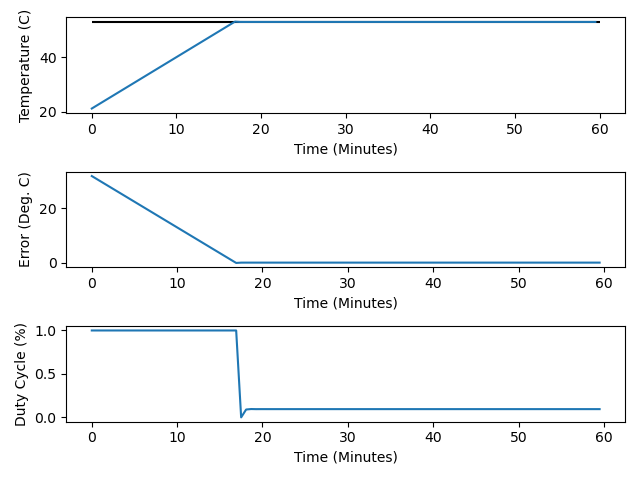
Well this looks pretty good! Note that it appears to take just about 18 minutes to rise from 20 C to 53 C, as we calculated earlier. To maintain steady-state temperature, this appears to require a duty cycle around 0.15 – the heater on about 15% of the time (15% of 35 second period = 5.25 seconds at a time). Whether this reflects reality or not remains to be seen.
Of note: because there is no I term, there is a constant error at steady state.
This error seems low on the graph (~1 C or so), but let’s play with the I term.
Normally, I’d play with the D term, but normally I’d expect to see oscillations.
However, this appears to be a pretty simple system, so I may be able to get away
without much work there. I arbitrarily chose I=0.01, and gave another run:
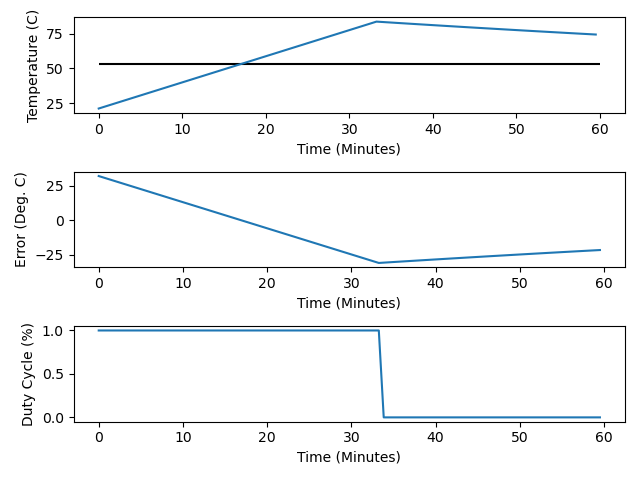
Whoa, overshoot! Time to turn I way down–I’ll try I=0.0001:
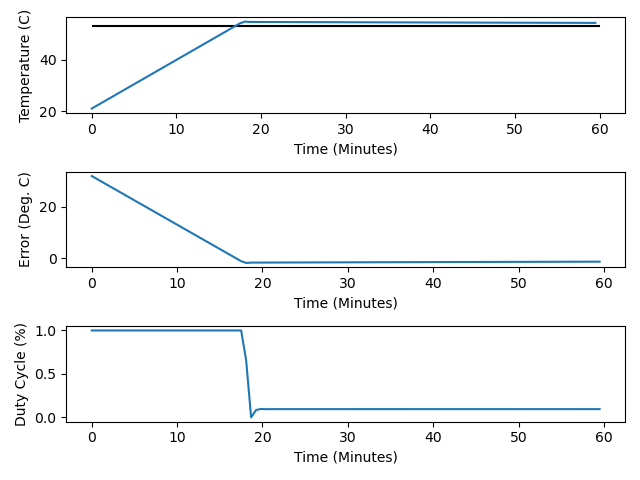
Better, but we still have a steady-state looking graph that sits a little bit
higher than the setpoint. Let’s lower I just a little bit, to I=0.00001 and
give another whirl:
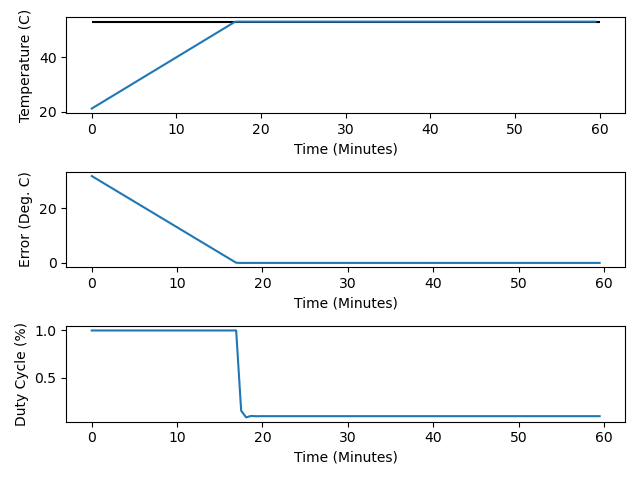
That’s quite a bit better. It looks very similar to the P-only graph, with slightly better
performance right at the setpoint (less overshoot).
Anyways, that’s enough simulation. Let’s get the real code written.
Real World
I used Python for the simulation work mostly because of the Matplotlib integration. My go-to language for general systems work has been Go–I find it pretty simple and has nice cross-compiling support. I decided to use my Raspberry Pi for this, since it’s pretty easy to enable the 1-wire interface (temperature sensor) and it’s easy to wire up a GPIO output to enable/disable the heater.
DS18B20 Driver
This was pretty straightforward: I simply ran raspi-config to enable the interface,
and installed the w1_therm kernel module and the sensor interface appeared in sysfs
in /sys/bus/w1/devices/<id>.
Reading from this sensor is fairly easy – the data is exposed via the w1_slave file:
32 01 4b 46 7f ff 0e 10 1e : crc=1e YES
32 01 4b 46 7f ff 0e 10 1e t=19125
In this example, the temperature is at the end (t=19125), and the value represents
degrees Celsius x 1000. In this example, the temperature is 19.125 C.
Writing the code to parse this was fairly straightforward: I simply split the string
on spaces, grabbed the last token, split it on = and converted the string to an integer.
Then I converted it to a float and divided by 1000. It’s not robust by any means, but it’s
quick and was accurate for me. This is pretty boring code, so I’ll just show you the signature:
func readTemperatureDegreesC(sensorName string) (float64, error) {...}
PID Code
Fortunately I did not have to write any PID controller code. Granted it’s not hard, but any code I don’t have to write is time in the bank! I used an existing package for PID controlling.
Heater Control
I wrote a little bit of helper code to handle exporting the GPIO used for heater control, and for setting it.
func enableGpio(gpio int) error {...}
func setGpioValue(gpio int, value bool) error {...}
I also wrote the code to handle the duty-cycling of the heater. This is a little bit more interesting, so here’s the code for it:
func executeDutyCycle(period time.Duration, percentage float64, heaterGpio int) {
	if percentage < 0 || percentage > 1 {
		log.Fatalf("percentage must be between 0 and 1")
	}

	if period < 0 {
		log.Fatalf("Invalid period (must be > 0): %v", period)
	}

	timeOnSeconds := time.Duration(float64(period) * percentage)
	timeOffSeconds := period - timeOnSeconds

	log.Printf("Duty Cycle: %v, On/Off: %v/%v", percentage, timeOnSeconds, timeOffSeconds)

	if timeOnSeconds > 0 {
		if err := setGpioValue(heaterGpio, true); err != nil {
			log.Fatalf("Failed to set heater value: %v", err)
		}
		time.Sleep(timeOnSeconds)
	}

	if timeOffSeconds > 0 {
		if err := setGpioValue(heaterGpio, false); err != nil {
			log.Fatalf("Failed to turn heater off: %v", err)
		}
		time.Sleep(timeOffSeconds)
	}
}
The idea here is that given the period and the duty cycle percentage (which is the output of the PID controller), turn on the heater for awhile, sleep, turn off the heater, and then sleep.
While I do like the Go time.Duration type in that it does a good job
of encapsulating unit complexity, it’s sort of annoying to work with
for this: one can’t simply get a fraction of a duration by multiplying
it with a float – you have to cast it first. I suppose it makes sense
in a language with strict typing, but it’s rather annoying nonetheless.
One thing of note is that I added a little bit of logic to ensure that we don’t toggle the power for 0 seconds. If the duty cycle is 1.0 (100%) or 0.0 (0%), then we simply spend the entire duty cycle in that state.
Control Loop
The control loop itself is pretty straightforward:
	for {
		if tempC, err := readTemperatureDegreesC(temperatureSensor); err != nil {
			log.Fatalf("Failed to read temperature: %v", err)
		} else {
			log.Printf("Temperature: %v C, Target: %v C", tempC, temperatureSetpointC)
			percentage := pid.Update(tempC)

			// Executing this duty cycle sleeps for the appropriate amount of time
			executeDutyCycle(periodSeconds, percentage, powerGpio)
		}
	}
The Run
Ok, the code is written, the only thing left to do is to turn it on!
Right away, the temperature started rising–this was encouraging. Shortly after, the power cable I was using to power the IOT Relay started to melt–that was bad. I turned it off immediately; turned out that I had grabbed the wrong IEC cable and did not check that it could handle the current for the heater (1000W / 120VAC = 8.3A). I grabbed the cable it came with and used that instead, and that worked as expected. After feeling shame for not double-checking this first, I resumed the experiment!
Data
Of course I logged the data during the run, so here are some useful plots:
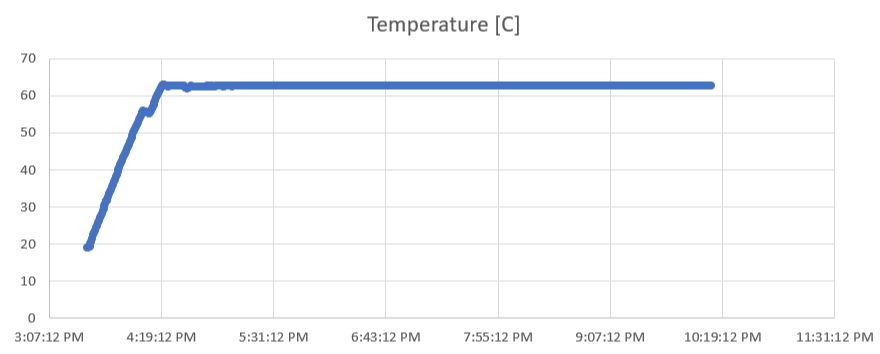
Two things of note on this plot:
- The little wiggle in the line at somewhere around 4:00PM is where I changed the hard-coded setpoint, so I turned off the heater, rebuilt the code and re-started the program.
- The timestamps on the bottom are UTC, so subtract 5 hours to get my actual time. Fortunately this doesn’t affect the shape of the curve at all.
At a glance, this looks pretty good–the temperature looks controlled and with minimal oscillations.
Here is a plot of the error, defined as the difference between the setpoint and the measured temperature:
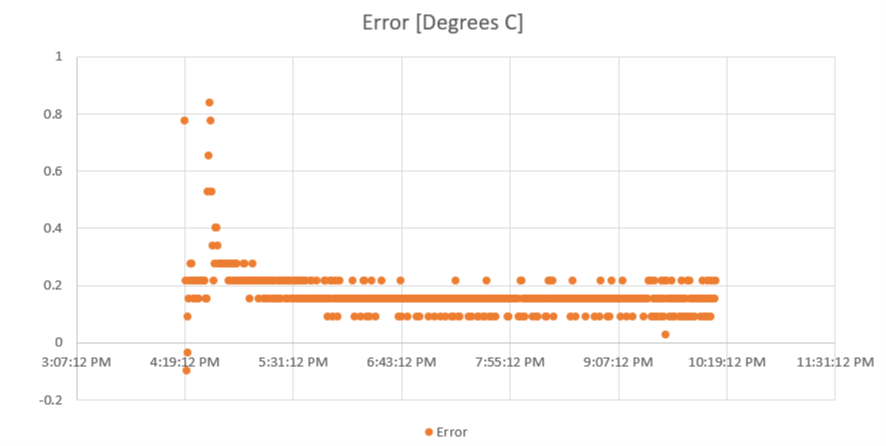
Again, it looks pretty good – temperature is within 1*C. Note that I’ve scoped this just to look at the steady-state temperature. On this plot, you can more clearly see when I added the meat (2.5 pounds of mostly-frozen pork loin roast). This is where the temperature spikes a bit. You can see it on the temperature plot above as well, but it’s much more subtle because of the scale.
Results
After about 4 hours in the water (this was basically when my daughter went to bed), I took the pork out of the bath. I’d preheated the oven to 500 F, with my cast iron pan in it. I put the pork roast in the pan and the pan back into the oven for 5 minutes, then rotated the roast and 5 more minutes and….
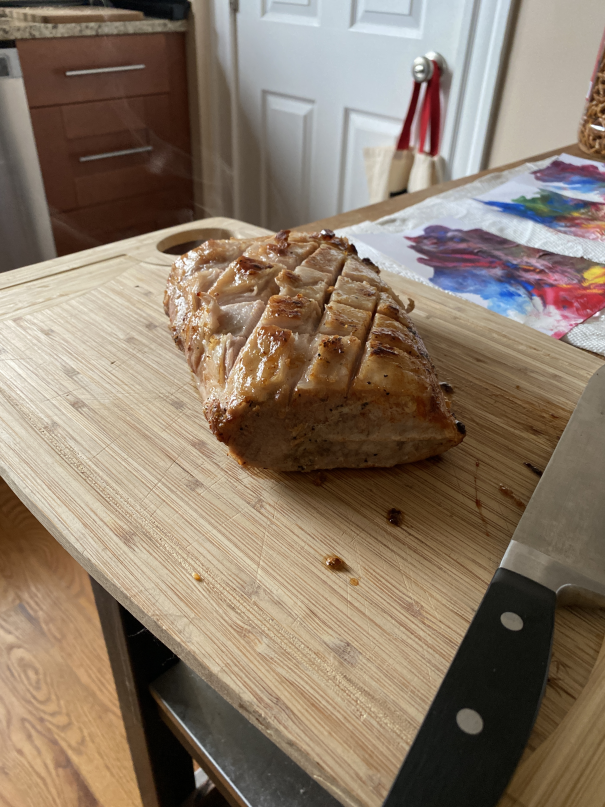
Looks pretty good!
Unfortunately, the meat wasn’t as juicy as I’d hoped for. I believe this was mostly due to me having the water temperature too high; I used 145 as the setpoint, and I think I should have put it around 130 F - 135 F, knowing that I’d put it into the oven for 10 minutes afterwards.
Ideas for Improvements
- Solid State Relay: The relay clicking on and off twice per 35 seconds was pretty annoying over the course of several hours. It’d be great to have something quieter.
- Lower setpoint for pork. 145 F is too high, causing the meat to be a little more dry than I’d hoped.
- Wireless Raspberry Pi so I don’t have to keep an ethernet cable connected while I cook.
- I’d be interested in using a water heater element in a chamber of water that is connected to the pump – this seems like it’d combine the heating and circulating bits into one. I’m not sure that it’s necessary, but it might make it a bit easier than suspending something in the water.
If you’re interested in my code for this, I’ve put it on my GitHub: https://github.com/jonathanfisher/sous-vide.